Sunday, April 28, 2013

Cream Cheese Meltaways

When I was a kid, I'd lose stuff and then have difficulty finding it again.  My dad was in the military, and the ID card that they give everyone was always the first thing to disappear.  My parents used to say, "It will always be the last place you look."

I felt very much that way for this baking challenge, for which Amanda from Our Italian Kitchen chose mini/bite sized treats.  Everything I found was delicious looking truffles, and I couldn't find anything that I actually had to bake.  I was so stuck on the truffle idea that I had almost given up, until I found these Cream Cheese Meltaways at Alida's Kitchen.  I found what I was looking for in the last place I looked.


Cream Cheese Meltaways
from Alida's Kitchen
Ingredients
1 1/4 cups all-purpose flour
1/2 cup cornstarch
1/8 teaspoon salt
1 cup powdered sugar
1/2 cup butter, softened
2 ounces cream cheese
1 teaspoon vanilla

Glaze
1 3/4 cups powdered sugar
1/4 cup  fresh lemon juice

assorted sprinkles, for decorating (optional)

Directions:
1) Preheat oven to 375 degrees.  Line cookie sheets with parchment paper and set aside.
2) In a medium bowl, whisk flour, cornstarch and salt until combined.
3) In a large bowl, add powdered sugar, butter, cream cheese and vanilla and beat at medium speed until light and fluffy. 
4) Add flour mixture to butter mixture, stirring until combined.  (Note: dough will be dry and crumbly). 
5) Shape dough into 1-inch balls (be careful not to overwork dough) and place on prepared cookie sheets.
6) Bake for 8 to 10 minutes, or until bottoms of cookies are lightly browned.  Cool 5 minutes of pan and then move to wire rack to cool completely.

Glaze:  In a medium bowl, whisk powdered sugar and lemon juice until smooth.  Dip the tops of cooled cookies into glaze and place on wire rack.  Decorate with sprinkles, as desired.  Let cookies stand until glaze is set.


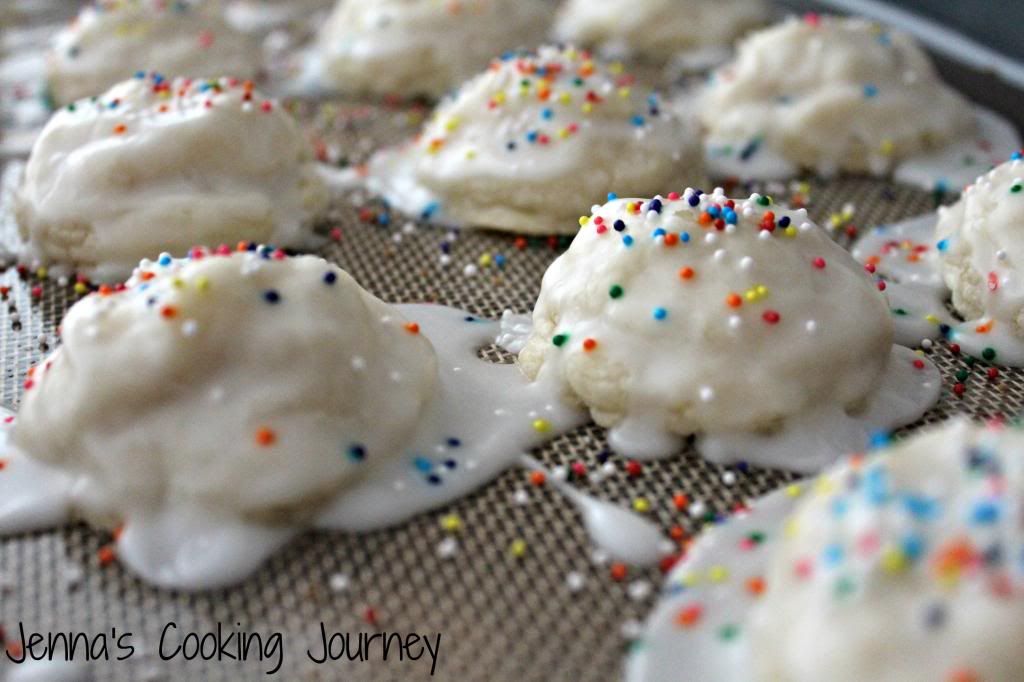
I have to admit that I thought these cookies were more addicting without the glaze.  To me the glaze tasted better after it had awhile to sit, but I still think they were better without.  These were slightly bigger than bite sized for me, but I definitely could have made them smaller too.  I only yielded 20 cookies, while Alida said the recipe makes 36.  These are fantastic cookies, and I'm glad I ran across them for the challenge.
 

Friday, April 26, 2013

Tex-Mex Sloppy Joes

Last Blogger's Choice recipe swap I participated in, I made Magic Monster Cookie Bars from Kate's Recipe Box.  This time around for the Blogger's Choice swap, I received Kate's blog again, so I decided to make one of the other recipes from her blog that I had wanted to make: Tex-Mex Sloppy Joes.  These have been going around a lot of blogs that I read, so I knew they had to be good.


Tex-Mex Sloppy Joes
slightly adapted from Kate's Recipe Box
Ingredients
1 can (14.5 oz) tomato sauce
2 teaspoons oregano
1 tablespoon ground cumin
1 teaspoon dried cilantro
1/4 teaspoon ground allspice
2 teaspoons Worcestershire sauce
1 1/4 lbs ground turkey
1 teaspoon canola oil
1/2 medium yellow onion, diced
1 jalapeno, minced (without seeds for less heat, with seeds for more)
2 cloves garlic, minced
12 oz. beer, such as a light ale or lager
2 tablespoons ketchup
1/4 cup fresh cilantro
1 tablespoon lime juice
Salt and black pepper to taste
Hamburger buns, cheese (I used pepper jack) and guacamole, for serving

Directions,
1) In a bowl, whisk together the tomato sauce, oregano, ground cumin, dried cilantro, allspice and Worcestershire sauce.
2) In a large skillet over medium heat, brown the ground meat, stirring occasionally until no longer pink, about 10 minutes.  Drain off the fat.
3) Add the canola oil to the pan with the browned meat then stir in the diced onion and the jalapeno. Cook until soft, about 5 minutes.  Add the garlic and cook for an additional 30 seconds.  Stir in the tomato mixture, along with the beer, ketchup and cilantro until well combined.
4) Let all ingredients come to a low simmer and then reduce the heat to medium-low and cook uncovered for 15 minutes. 
5) Toast buns under the broiler until lightly browned.
6) Stir in the lime juice and season with salt and pepper to taste. Serve on warmed buns with cheese and guacamole.


My modifications and substitutions were based on things that I couldn't eat in the original recipe.  I think the chipotle in adobo would add that smoky flavor, that these don't have.  However, these turned out to be the best sloppy joes that I have made so far.  I used ground turkey since I knew there would be so many other flavors.  I think what made these great was the addition of the beer.  It gave just that extra kick of flavor.  I did use pepper jack on top of using the jalapeno with the seeds, so ours were a little on the spicy side.  Thanks again for another great recipe Kate!


Thanks again Sarah, at A Taste of Home Cooking, for hosting the swaps.  They always result in great food!  Please find the other recipes from the swap below.

Wednesday, April 17, 2013

Chilaquiles with Salsa Verde

Sometimes my work day seems really long and by the time I get home I don't want to make dinner and even ordering out seems like too much work.  This is where this meal comes in handy.  If you use store bought chips, this meal takes about 10 minutes, and is delicious.  Plus, it isn't too expensive to make. 

Chilaquiles with Salsa Verde
from Everyday with Rachael Ray
Ingredients
3 cups salsa verde
3 4 1/2 ounce cans  diced mild green chiles
6 cups tortilla chips
1 cup sour cream
5 ounces queso fresco (or Mexican blend), crumbled
1/4 cup sliced radishes
1/4 cup chopped cilantro
Directions
1) In food processor, mix salsa and chiles for 20 seconds.
2)) Pour sauce into large nonstick skillet; bring to simmer over medium. Lower heat to medium-low, add chips and toss to soften slightly.
3) Divide among plates. Top with sour cream, cheese, radishes and cilantro.


 I have never had radishes before this dish, so it was a new experience for me...I didn't realize they were had a kick towards the end of eating them. I liked this dish a lot, but I found it kind of spicy.  I really need to start reading the labels on the jars of salsa that I buy, I think I'd save myself some pain, although the radishes probably didn't help either.

I made chips from scratch using corn tortillas and Jacob said that the homemade chips made it even better.   Jacob didn't even miss the meat in this dish and went back for seconds.  Whether you make your chips from scratch or just buy a bag of your favorite chips at the store, this is a great, simple dinner.

Monday, April 15, 2013

Roasted Eggplant Spread

It's time for another Eating the Alphabet Challenge.  I missed last month as March is the craziest month in my family.  Three birthdays and an anniversary all within two weeks is a lot to do.


This month, the letters for the alphabet challenge were 'E' or 'F'.  I honestly wanted to try something with figs.  I found some great goat cheese and fig recipes, but then I found out that they aren't really in season yet.  Nonetheless, when they do come into season, I found some great recipes.

When I ruled figs out, I kept thinking about eggplants.  I am one of the few people that I know personally that LOVES them.  If I was still single, I think I'd eat several of them a week, but my husband isn't a fan.  One of my favorite flavors for eggplants is roasting them, so I found this new recipe for a spread that I knew would be simple yet delicious.

Roasted Eggplant Spread
slightly adapted from FoodNetwork
Ingredients
1 medium eggplant
1 red bell peppers, seeded  
2 garlic cloves, minced
3 tablespoons good olive oil
1 1/2 teaspoons kosher salt
1/2 teaspoon freshly ground black pepper
1 teaspoon oregano
 
Directions
1)  Preheat the oven to 400 degrees F.
2)  Cut the eggplant and bell pepper into 1-inch cubes. Toss them in a large bowl with the garlic, olive oil, salt, pepper, and oregano. Spread them on a baking sheet. Roast for 45 minutes, until the vegetables are lightly browned and soft, tossing once during cooking. Cool the vegetable mixture slightly.
3) Place the vegetables in a food processor fitted with a steel blade, pulse 3 or 4 times to blend. Taste for salt and pepper.


 I like this spread as an appetizer idea because it seems like a lot of appetizers are either really heavy with cheese or meat based.  This is really simple, but the roasted flavor of both vegetables really comes through.  Depending if you like roasted red peppers or the roasted eggplant more, you could go heavier on the vegetable that you like.  I served these with pita chips and it was amazing.  Definitely a great appetizer.

Please check out all the other letter 'E' and 'F' submissions below.  Thanks Brenda for hosting this challenge!


Friday, April 12, 2013

Chicken Parmesan Roll-ups

This time the theme for the recipe swap, hosted by A Taste of Home Cooking, was Chicken.  I entered this swap mainly because it seems like I'm always struggling to find new ways to eat chicken.  When I ask my husband what kind of chicken dishes he wants for the week, he always requests barbeque chicken, and while I love barbeque chicken, it is nice to find other recipes.


I received My Chicago Kitchen's Gluten Free Chicken Parmesan Roll-ups.  I've actually never made chicken parmesan before.  I made tofu parmesan back when I first joined the swap.  I was excited though because I think roll-ups can be a fun vessel for fillings.


Chicken Parmesan Roll-ups
adapted from My Chicago Kitchen
Ingredients
4 boneless, skinless chicken breasts, pounded thin
1/2 cup ricotta cheese
4 tablespoons parmesan cheese
8 tablespoons shredded mozzarella cheese, plus more for topping
1/8 cup frozen spinach, defrosted and strained
4 basil leaves, divided (I tore mine into small pieces)
4 roasted red pepper halves (I used jarred), trimmed to fit inside the chicken breasts
1 jar favorite marinara sauce (or 1 1/2 c. prepared marinara)
Toothpicks
 
Directions
1) Heat oven to 350 F.
2) Mix together in a bowl the ricotta, parmesan cheese, shredded mozzarella, and spinach.
3) Lay chicken down in front of you and distribute evenly the ricotta mixture.  On top of the mixture place basil pieces, and red pepper pieces.
4) Roll up the chicken breasts and secure them with your toothpicks. 
5) Pour 1 cup marinara into the bottom of a 9 x 13 in. pan and nestle in your roll-ups, seam side down. Top with remaining marinara and additional cheese. Bake uncovered 45-50 minutes, until cooked through. When ready to serve, spoon cooked marinara over the top.
 
 
Angie's recipe doesn't have a ricotta mixture on the inside, but since it isn't a breaded chicken dish, I felt it needed a little more filling.  The problem I ran into was putting so much filling into each chicken breast, that they were hard to roll.  These were delicious.  I loved the spinach and the roasted red pepper combination on the inside.  This dish was easy to put together and tasted really delicious.
 
Please check out all the other chicken recipes from this swap below!


Tuesday, April 9, 2013

Triple Peanut Butter Bars

Back around Christmas, I participated in a cookie swap.  The person that I received said that she loved peanut butter cookies and oatmeal caramelitas, so I set out to research something that could infuse the two.  For the longest time, I wasn't finding anything and then one day on pinterest, I guess I entered the magic search phrase and these appeared.  They have some of the same qualities as a caramelita (the crumbly oatmeal bottom and top layer) but the flavorful middle part.   

The cookie swap was a success, but I never posted the recipe for my cookie bars because I never took a picture.  Recently, I decided to make these for Jacob's coworkers and so I snapped a shot so I could post these bars.  

Triple Peanut Butter Bars
slightly adapted from Midwest Living
Ingredients
1 1/2cups quick-cooking rolled oats
1 cup all-purpose flour
1 1/2 cups packed brown sugar
1 teaspoon baking powder
1/2 teaspoon baking soda
1 cup butter
1/2 cup chopped, unsalted dry roasted peanuts
1 cup peanut butter-flavored pieces
1/2 cup semi-sweet milk chocolate chips
1 cup packed brown sugar
1/4 cup butter, cut into pieces
1/4 cup peanut butter
1 egg, lightly beaten
1 1/2 teaspoons vanilla
1 1/4 cups all-purpose flour
1/2 teaspoon baking powder
1/4 teaspoon baking soda

Directions
1) Line a 15x10x1-inch baking pan with foil, extending the foil over edges of pan; set aside.
2) For crust: In a large bowl, combine oats, the 1 cup flour, the 1-1/2 cups brown sugar, the 1 teaspoon baking powder and the 1/2 teaspoon baking soda. Using a pastry blender, cut in the 1 cup butter until mixture resembles coarse crumbs.
3) Remove 1 cup of crumb mixture to reserve for topping. Stir peanuts and peanut butter-flavored pieces into the 1 cup reserved topping mixture; set aside.
4) Press remaining crumb mixture onto the bottom of prepared baking pan. Bake in a 350 degree F oven for 10 minutes. Cool at least 15 minutes in pan on a wire rack.
5) In a medium saucepan, heat the 1 cup brown sugar, the 1/4 cup butter and peanut butter over medium heat until butter melts and mixture is smooth, stirring constantly. Cool slightly. Stir in egg and vanilla. Stir in the 1-1/4 cups flour, the 1/2 teaspoon baking powder and the 1/4 teaspoon baking soda. Drop in very small mounds evenly over the crust in pan. Sprinkle with reserved topping mixture.
6) Bake in a 350 degree F oven for 18 to 20 minutes or until a wooden toothpick inserted near center comes out clean. Cool completely on wire rack before lifting from pan using edges of foil and cutting into bars.
 
 
These to me are the perfect bars.  They have a little bit of chocolate, the peanut butter, and then the crumbly cookie portion.  I think these would make the perfect summer picnic bars for parties or even just park trips.  They are pretty crumbly, so make sure you have a crumb-catcher in hand (or a dog/vaccuum cleaner)...plus a really big glass of milk.  All the great desserts need a good glass of milk.

Monday, April 8, 2013

Secret Recipe Club: Chicken Taco Cornbread Wedges

For the Secret Recipe Club Swap this month, the swap in which you are assigned someone's blog and allowed to choose any recipe you want to make, I was assigned Barbara Bakes.  Barbara started her blog to join the Daring Bakers challenges and I started my blog to join in on the recipe swaps that a food forum I participate in host.  Her recipes all sound so good and I had a hard time choosing from desserts like: Cherry Chocolate Chip Oatmeal Toffee Cookies, Rocky Road Brownie Bites, and main dishes like: Queso Bacon Burgers and Avocado Salsa, or Chicken Empanadas with Ranchero Ranch Dressing.

Secret Recipe Club


My birthday was March 22nd, and for my birthday I received this gorgeous cast iron skillet.  Every blog I came across I searched to see if they had any recipes that reference their cast iron skillet.  Barbara had this Chicken Taco Cornbread dish that looked delicious and a great first start for my cast iron, so I knew I had to make it.

Chicken Taco Cornbread Wedges
barely adapted from Barbara Bakes
Ingredients
Chicken
2 chicken breasts
1 teaspoon cumin
1 teaspoon dried cilantro
1 teaspoon ranch seasoning

Dressing
1/2 cup ranch dressing
1/2 cup salsa verde
1 cup tightly packed cilantro leaves (or 1/2 cup freeze dried cilantro)
 
Filling
2 tablespoons extra virgin olive oil
1/2 medium onion, finely chopped
1 tablespoon finely chopped jalapeno pepper
2 cups shredded chicken
3 tablespoons finely chopped cilantro leaves (or 2 T. freeze dried cilantro)
1/2 teaspoon salt
1 teaspoon cumin
1/4 teaspoon black pepper
1 can (14 1/2 oz.) diced tomatoes with green chilies (Rotel Original)
 
Crust
2 cups Marie Calender’s Cornbread Mix
1 cup milk
 
Toppings
1 1/2 cup Colby & Monterey Jack cheese, shredded
3 cups shredded romaine
1 cup chopped tomatoes
 
Directions
1) Heat oven to 400 degrees F.
2) Sprinkle chicken with seasonings and bake until internal temperature is 160 degrees.  Once chicken is done, shred with two forks or place chicken breasts in mixer with paddle attachment and mix on low until shredded.
3) Combine ranch dressing, salsa and 1 cup cilantro leaves in a small food processor or blender. Process until well blended. Cover and refrigerate.
4) In 12-inch cast iron skillet, heat olive oil over medium heat. Add onion, and jalapeno pepper; cook 3 to 5 minutes or until vegetables are tender, stirring frequently. Stir in chicken, cilantro, salt, cumin, pepper and tomatoes with green chilies; cook 5 minutes. Remove from skillet. Wipe out skillet with paper towel; grease.
5) In large bowl combined cornbread mix and milk. Pour cornbread mixture into skillet. Spoon chicken mixture over cornbread mixture; sprinkle with cheese.
6) Bake at 400 degrees F. for 35 to 40 minutes or until golden brown. Cut into wedges. Top with romaine and tomatoes; drizzle with dressing.


This is easily the best dish that I've made in awhile.  The flavors are just so pronounced in such a short amount of time, that everything in this dish just pops.  The ranch is amazing, and probably something that I'll start making just for regular salads.  I've never made cornbread before, but Marie Calendars was such a great compliment to the chicken.  I cannot eat a lot of spice, and this to me was quite spicy.  However, it was so delicious that I ignored the heat and kept eating.  If you're serving it to people that can't eat spices, I'd make sure that the Rotel and salsa you used were mild, but also cut back on some of the cumin.  I know that this will be a dish that will get made in our house a lot, and am excited to have found such a great recipe for my cast iron skillet on my first use. 

Please find all the other great Secret Recipe Club recipes below.


Friday, April 5, 2013

Arugula Pesto Meatloaf

Spring brings some weird weather that confuses me when I'm meal planning.  Some days are rainy and cooler and then the next day it can be sixty and beautiful.  These are the last few days that I try to cram the last of my comfort food recipes into the meal plan.  This is one of those dishes that I really wanted to try to get in before it got too warm for meatloaf.  While I love meatloaf, it is just too heavy for the summer months when it is warm and humid.

Arugula Pesto Meatloaf
slightly adapted from Everyday with Rachel Ray
Ingredients
Cooking spray
1/4 cup panko breadcrumbs
2 pounds meatloaf mix (beef, pork and veal)
1 clove garlic, grated
1 egg, lightly beaten
Salt and pepper
1/2 cup ricotta
2 cups arugula
1 cup olive oil
1/2 cup pine nuts
1/2 cup parmesan
1/2 cup shredded provolone cheese
 
Directions
1) Preheat to 400 degrees . Line a baking sheet with foil; coat with cooking spray.
2) Using a food processor, pulse 2 cups arugula, 1 cup olive oil, 1/2 cup each pine nuts and parmesan, and pinch salt.
3) Combine the breadcrumbs, meatloaf mix, ricotta, garlic, egg, salt and pepper. Shape into a 5-by-8-inch rectangle on the sheet.
4) Bake about 30 minutes, then remove and top with pesto and provolone and bake until thermometer reads 160 degrees, about 10-15 more minutes.  Let rest 10 minutes before serving.


The pesto makes this meatloaf lighter and delicious.  I usually stick to basil pestos, but am glad that we stepped outside the meatloaf box to try this recipe.  It really makes me want to try to make other types of pestos.  The only comment that I have for the pesto is that it seemed a little thin to me.  I think a cup of olive oil made it a little too runny.  Next time, I'll add a quarter of a cup of oil at a time to try to get a better consistancy that will better adhere to the meatloaf.  This pesto would be great on meatballs too.

Wednesday, April 3, 2013

Buttermilk Cheddar Biscuits and Gravy

A lot of the time while I'm making dinner, I'll have Food Network on in the background.  Diners, Drive-Ins and Dives is on about 90 percent of the time, but it is good background noise.  One day, while I was cooking, I heard Guy Fieri mention Cheddar Biscuits and Gravy.  I thought they sounded delicious so I wrote Cheddar Biscuits and Gravy on my fridge calendar to remind myself to look it up.

I couldn't find the recipe from the episode, but I found plenty of other recipes on blogs that sounded equally delicious.  I love this age where we can get a meal idea and use the internet to find something that sounds similar in under ten minutes.

Buttermilk Cheddar Biscuits and Gravy
barely adapted from Tiny Test Kitchen
Ingredients
Biscuits
2 cups flour, plus more for rolling out the dough
1 tablespoon baking powder
1 teaspoon kosher salt
12 tablespoons cold unsalted butter, cut into small cubes
1/2 cup cold buttermilk, shaken
1 cold large egg
1 cup grated Cheddar
1 egg beaten with a splash of water

Sausage Gravy1/2 teaspoon canola oil
1/2 lb sweet Italian sausage
1/2 tablespoon butter
2 tablespoons flour
1 1/2 cups whole milk

Directions
Biscuits
1)  Heat oven to 425ºF. Line a baking sheet with a Silpat or parchment paper and set aside.
2)  Add the egg to the buttermilk in a measuring jug and beat to combine, set aside.
3) Take a tablespoon of the flour and add it the grated cheese. Toss to coat the cheese with the flour, set aside.
4) Place the remaining flour, baking powder and salt into a bowl of an stand mixer fitted with the paddle attachment. Combine the ingredients with the mixer on low. Add the butter and mix until the butter is the size of peas. You may need to shut the mixer off and manually rub the butter into the flour to get the butter pieces all the same size.
5) Turn the mixer back to low and add the buttermilk mixture to the flour in one addition. Mix until just combined. Add the cheese mixture to the dough and mix until just combined. Stop the mixer.
6) Using clean counter space, flour a 12×12″ area well. Form a ball with the dough in the mixer bowl and place it on the flour. With lightly floured hands, knead the dough gently. Using your hands again, form a 5×10″ rectangle with the dough.
7) Using a 2 3/4″ biscuit cutter ( or a small cup), cut out 8 biscuits from the dough. Reform squares of the same thickness to get the last biscuits.
8) Place biscuits on the prepared baking sheet.
9) Brush the tops of the biscuits with the egg wash and pop in the oven for 20 minutes, until golden grown.

Gravy
1) Heat the oil in a 9″ saute pan over medium high heat. Add sausage and break up any large pieces with a wooden spoon. Cook until the sausage is browned.
2) Remove the sausage with a slotted spoon, trying to keep as much of the oil and fat in the pan as possible. Add the butter (less if you have a lot of oil) and allow to melt. Add flour and begin to whisk continuously for 2 minutes until the flour and butter have formed a smooth paste and the flour is cooked.
4) Begin to add the milk in a thin stream, whisking all the time to prevent lumps.
5) When all the milk is added, let the gravy simmer gently for 2-3 minutes to make sure the milk is heated through.
7) Re-add the sausage and cook on medium low heat for 2-3 minutes.


I love biscuits and gravy.  I loved the biscuits by themselves.  I just used regular packaged cheese in our biscuits and I do think to achieve the full cheddar flavor from the biscuits you do have to use something sharper and more pronounced.  While the recipe looks labor intensive, it isn't difficult.  It definitely isn't a weeknight recipe, but made for a delicious Saturday breakfast at home watching our recorded shows from the week. 

Monday, April 1, 2013

Sloppy Moussakaas

I am somewhat of a sandwich addict.  They are just so easy, and usually so delicious, that I have a hard time not putting several sandwiches on my menu plan every week.  I get Rachel Ray's magazine and usually her sandwiches and burgers sound so delicious that I save the magazines until I try them all.  When I saw this recipe for a spin-off on Sloppy joes, I knew I had to make it.

Sloppy Moussakaas
slightly adapted from Everyday with Rachel Ray
Ingredients
1 tablespoon olive oil
1 pound ground lamb or beef
Salt and pepper
1/8 teaspoon ground cinnamon
1 onion, finely chopped
1/2 green bell pepper, finely chopped
3 cloves garlic, chopped
1 small jalapeno, seeded and chopped
1 teaspoon dried oregano
2 teaspoons tomato sauce
1 - 1 1/2 cups chicken or beef stock
2 tablespoons butter
1 1/2 tablespoons flour
1 cup milk
Freshly grated nutmeg
A small handful feta cheese
4 ciabatta or other rolls, split and toasted
 
Directions
1) In a large skillet, heat the olive oil, over medium-high heat. Add the lamb (or beef) and cook, crumbling the meat, until well browned, about 5 minutes.
2) Season with salt, pepper and the cinnamon. Add the onion, bell pepper, garlic, jalapeno and oregano and cook, stirring, for 3 to 4 minutes. Stir in the tomato sauce and cook for a minute. Stir in the stock and simmer over low heat until thickened slightly, about 15 minutes.
3)   In a saucepan, melt the butter over medium heat. Whisk in the flour and cook, stirring, for 2 minutes. Whisk in the milk and cook until thickened slightly; season with salt, pepper and nutmeg. Remove the sauce from the heat and whisk in the cheese.
4) To serve, spoon the meat mixture onto the rolls. Top with the sauce.


I thought these were great.  The sauce was a little grainy, but the flavor was still good.  Jacob loved the saltiness of the feta on the sandwiches while I loved the cinnamon flavor in the meat.  I think these were a great spin-off on regular sloppy joes.  Even though they aren't really Greek, they were really great and came together really fast.  For some reason these make me want to curl up with My Big Fat Greek Wedding and a bag of popcorn.