Tuesday, August 30, 2011

Banana Bread

We were grocery shopping this week and I walked past a big sign that read "Bananas on sale for 20 cents a pound, great for Banana Bread!". 

I don't really like bananas.  I think it is a texture thing.  I try to pick one up every once in awhile, but always fail to eat the entire thing.  However, I love banana bread.  I guess anything is better when it is hidden inside something amazing.

I found a super easy recipe.  One that doesn't even call for a mixer.  I doubled the recipe and now have breakfast for a long time to go.

Banana Bread

Ingredients

  • 3 or 4 ripe bananas, smashed
  • 1/3 cup melted butter
  • 1 cup sugar (can easily reduce to 3/4 cup)
  • 1 egg, beaten
  • 1 teaspoon vanilla
  • 1 teaspoon baking soda
  • Pinch of salt
  • 1 1/2 cups of all-purpose flour

Directions

1) Preheat the oven to 350 degrees.
2) Mixed mashed bananas and butter in a large mixing bowl.
3) Mix in the sugar, egg, and vanilla.
4) Sprinkle in the baking soda and the salt.
5) Add flour and mix well.
Cook for 1 hour, yields one loaf.


I thought it tasted great.  I didn't mash the bananas too fine, so there are big chunks in there.  I also put a little extra vanilla just because I am a fan of the "imitation" vanilla flavoring.  This has inspired me to try other breakfast creations: muffins, maybe scones. 

Rootbeer BBQ pulled pork

The weather channel is saying that our run of high summer temperatures will break next week.  Which means that cold weather is probably somewhere a few weeks behind.  I felt like making something that is easy but had that summer feel to it, so I chose pulled pork.

This time I changed up my recipe quite a bit.

Rootbeer BBQ Pulled Pork
adapted from Allrecipes.com Pulled Pork
Ingredients
  • 1 (3 pound) pork shoulder

  • 1 (12 fluid ounce) can or bottle root beer (we used our SodaStream rootbeer)

  • 1 (18 ounce) bottle your favorite barbecue sauce

  • 2 tbsp brown sugar

  • 1 tbsp butter

  • 1/4 large white onion, chopped

  • 8 hamburger buns


  • Directions
    Place pork shoulder in the crockpot.  Cover with rootbeer, barbecue sauce, and onions, and place on low for 7 to 8 hours.  Pull out of crockpot and shred meat with 2 forks.  Serve over buns.

    Sometimes I shred the meat and put it back in the sauce for about thirty minutes more just so that the individual shredded parts get soaked in the sauce for a little bit.

    From the picture, you can see it was very messy, but amazing as well.  The BBQ sauce tasted great with all the add-ins.  The onions took on the color of the rootbeer and BBQ sauce but they provided some great flavor to the meat as well.  Maybe we'll have a summer picnic in the winter and pull these sandwiches out again.

    Garlic Lime Shrimp Pasta


    The theme to the recipe swap this time around was Seafood/Fish.  I received Garlic Lime Shrimp Pasta from Gourmet: Day to Day's Kevinslady. 

    Jacob and I have been trying to eat more seafood/shrimp, but it is still a work in progress since seafood/shrimp have very fine lines between underdone and overdone.  I was excited about this recipe though because everything was already in my cabinets at home.  I didn't have to buy anything.

    Garlic Lime Shrimp
    adapted from Gourmet: Day to Day
    Ingredients
    Garlic lime shrimp:
    1.5 pound uncooked large shrimp, peeled and deveined
    5 garlic cloves, minced
    1/2 teaspoon salt
    1/4 cup butter (original recipe calls for 1/2 cup)
    3 tablespoons lime juice
    1 tablespoon minced fresh parsley
    1 lb Hot cooked pasta (I used fusilli pasta instead of spaghetti noodles)

    Flavored butter “finishing” sauce:
    2 tablespoons butter
    1/2 tablespoon feta cheese crumbled
    1 clove of garlic minced
    1/2 tablespoon chopped parsley
    1 teaspoon olive oil

    Directions
    1)  Combine all ingredients for the flavored butter finishing sauce and whisk well to combine. The softer the butter is, the easier it will be to combine the ingredients.  Cover and put in the fridge.
    2) Start boiling the pasta you're using.
    3) In a large skillet, saute the shrimp, garlic, salt in butter until the shrimp turn pink, about 5 minutes. Turn off the heat once they become pink, so they don't overcook. Once shrimp are cooked add the flavored butter, coat shrimp. Next, stir in lime juice and parsley. Serve with pasta.
    I liked this recipe a lot.  I love that the lime juice didn't seep into the shrimp and override the buttery shrimp flavor too.  I think that the flavored butter was good, but I definitely thought the dish needed some kind of cheese.  I think that sprinkling parmesean on the top may bump the dish up to the next level. 

    My husband liked it a lot too, but said that the pasta wasn't right for this dish, which I agree.  I just feel that spaghetti gets way too messy and complicated and wanted something smaller.  But, looking back I think fettucine noodles may be the best choice since they are more substantial.  The fettucine noodles would probably hold up to the ingredients much better. 


    Herb Mustard Pork Loin

    Jacob loves pork.  I am constantly trying to find new pork recipes.  One day while clicking from one blog to another, meal planning, I found this recipe on Budget Bytes for Herb Mustard Pork Loin.  The thing that enticed me to make it was the creamy sauce that you put on top. We also love dijon mustard so I added extra in both the marinade and the sauce.  It was such an easy meal to make.

    Herb Mustard Pork Loin
    adapted from Budget Bytes

    Ingredients
    For the pork:
    3/4 cup dijon mustard
    1 tbsp olive oil
    3 sprigs of fresh thyme
    3 cloves of garlic
    1 handful parsley
    1 pork tenderloin

    Sauce:
    1 tbsp olive oil
    1 chicken bouillion cube
    1/2 cup water
    3 sprigs of thyme
    3 tbsp Dijon
    4 ounces sour cream

    Directions 
    1) In a bowl combine the mustard, olive oil, minced garlic, thyme and parsley. Stir it up good. Place the pork loin in a large dish, coat it with the marinade, cover and refrigerate for at least two hours (the more time it marinates, the more the flavor develops).

    2) Preheat the oven to 375 degrees. Spray a baking sheet or glass dish with nonstick spray and place the pork loin inside. Scoop up any marinade left in the bowl and paste it over the meat. Roast for about 40 minutes or until the internal temperature reaches 160 degrees (I am at altitude, so it took closer to 60 minutes).

    3) In the last twenty minutes of the pork cooking, make the sauce. Saute garlic in a pan with some olive oil. Add the bouillon, water, 3 Tbsp of dijon and thyme. Let simmer for about 10 minutes (volume will reduce during this time). Turn off the heat then whisk in the sour cream. Season with fresh black pepper.

    4) Let the pork rest for at least 5 minutes after you take it out of the oven to let the juices redistribute. Slice on an angle into medallion. Plate the medallions and spoon sauce over top.
    *served with stuffing


    Before I had even plated mine, I heard an "Oh my gosh, this is good" come from my husband in the living room.   He went back and finished off the pork tenderloin and the stuffing and exclaimed that we should have it again.  I loved the sauce, but he thought the sauce wasn't needed since the pork had so much flavor on its own.  Maybe next time I'll only make a little bit of the sauce for me, and he can just eat the pork. 

    Definitely a successful meal.

    Saturday, August 27, 2011

    Green Chile Cheeseburgers

    At our Farmer's market, there are several people who fire roast green chiles.  As you're walking through the market it just smells so great that you can't help but stop and buy a bag of them.  One of my favorite recipes to use green chiles in is Green Chile Cheeseburgers.  They are just so juicy and the flavor combination is just irresistable.

    Green Chile Cheeseburgers
    adapted from the Cook this, Not that! cookbook

    Ingredients
    1 lb ground beef or brisket
    1 can of roasted green chile, drained and chopped (I used three chiles from the farmer's market)
    4 slices of pepperjack cheese
    4 buns (we like to use fresh bakery buns from our grocery store)
    4 slices of tomato
    4 slices of onion
    salt and pepper
    cumin
    cilantro

    Directions
    1) Heat a grill, or stovetop grill pan (I've even used our panini maker before).  Season the meat with salt and pepper, a pinch of cumin, and a pinch of cilantro.
    2) When the grill or pan is hot,  add the burgers.  Cook for about 5 minutes on the first sid (until nicely charred), then flip the burger and immediately top with the chiles and the cheese (the recipe from the cookbook calls for swiss which also tastes really good).  For medium rare burgers, cook about 4 minutes longer, for other temperatures, cook longer.  Remove the burgers and toast the buns on the grill or pan.


    The cilantro and cumin are both really strong flavors in the burger and make it different than your everyday cheeseburger from the grill.  The pepperjack cheese gives the burger a little bit of heat but just adds another kick to the flavors popping in your mouth.  This burger is amazing and can be served with any of your favorite side dishes.

    Friday, August 19, 2011

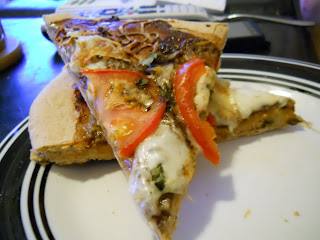
    Caprese Pizza

    I have to admit there is always a moment of shear nervousness when the Recipe Swap recipe comes into my mailbox.  When I read the What's For Dinner Posts, I feel sometimes that the cooking skills of the women on the board are light years beyond the skills that I have.  But, it is something fun to do and how do you grow as a cook if you don't try new things, right?  Plus, everything I've made has turned out really good so far, so maybe I should start approaching the swaps with confidence and not be so nervous every time a recipe comes in.  The theme to this swap was Italian, and I received Lindsay's Caprese Pizza from Life and Kitchen which turned out great just like I thought it would.

    Jacob LOVES making dough.  He gets super excited every time I ask him to make it for me.  He had never made whole wheat pizza dough though and so to challenge him, I asked him to make it.  He readily took on the challenge and all I had to do was pick up the ingredients.  :)


    Wheat Pizza Dough
    adapted from allrecipes.com
    Ingredients

    • 1 (.25 ounce) package active dry yeast
    • 1 cup warm water (110 degrees F/45 degrees C)
    • 2 cups whole wheat flour
    • 2 tablespoons olive oil
    • 1 teaspoon salt
    • 2 teaspoons white sugar
    Directions
    1. In a small bowl, dissolve yeast in warm water. Let stand until creamy, about 10 minutes.
    2. In a large bowl, combine 2 cups bread flour, olive oil, salt, white sugar and the yeast mixture; stir well to combine. Beat well until a stiff dough has formed. Cover and rise until doubled in volume, about 30 minutes.

    Now it was time for the pizza.  I read the instructions from Lindsay's blog and got a little cocky.  I figured I could read the recipe in my computer room and make it in the kitchen with no problem since my printer is out of ink.  So I messed some things up.  But it still turned out great, so I guess no complaining.
    Caprese Pizza
    (messed up...haha) using the recipe from Life and Kitchen
    Ingredients 

    • 1 pizza dough (you can make your own, buy fresh from a pizza shop/grocery, or just do a premade crust like Boboli)
    • 1/3 cup balsamic vinegar
    • 3 tomatoes, thinly sliced
    • ~ 1/3 – 1/2 pound of fresh mozzarella, thinly sliced (or you could do about 1 cup of shredded, but it’s not as good)
    • 1/4 cup fresh basil
    Directions

    • If using a homemade crust, pre-cook the crust for about 5 minutes at 425 degrees.
    • Reduce the vinegar on the stove so that it has a syrup consistency.
    • Once the crust is preheated and the vinegar is at the right consistency, assemble the pizza.  Use the vinegar as the sauce, then place your mozzarella, the tomatoes, and the basil.
    The pizza tasted great.  I do think that it would have been better if I used the oil as the sauce and then drizzled the vinegar on the top as a "finisher" instead of drowning the crust in it.  But Jacob liked it a lot.  So I think it'll make it's way back into the rotation with half of it having some type of meat on it next time though.  Lesson learned: Don't assume you know the recipe after you've read it once.  Haha.


    Summer Squash and White Bean Saute

    I love Farmer's Markets.  Going around and viewing the produce, breads, oils, and pastas.  Sampling homemade salsas, peanut butter spreads, and honey.  It just screams summer, and since the majority of these main ingredients are found at the Farmer's Market, it is a great summer dish.  With only two main preparation steps, it doesn't eat up too much time too, so you can get back out to having fun in the sun again.


    Summer Squash and White Bean Saute- adapted from EatingWell.com

    Ingredients
    • 1 tablespoon extra-virgin olive oil
    • 1 medium onion, halved and sliced
    • 2 cloves garlic, minced
    • 1 medium zucchini, halved lengthwise and sliced
    • 1 medium yellow summer squash, halved lengthwise and sliced
    • 1/2 eggplant 
    • 1 tablespoon chopped fresh oregano, or 1 teaspoon dried
    • 1/4 teaspoon salt
    • 1/4 teaspoon freshly ground pepper
    • 1 15- or 19-ounce can cannellini or great northern beans, rinsed (see Tip)
    • 1 medium tomato, chopped
    • 2 tablespoon red-wine vinegar
    • A couple of pinches finely shredded Parmesan cheese
    Directions

    • Heat oil in a large nonstick skillet over medium heat. Add onion and garlic and cook, stirring, until beginning to soften, about 3 minutes. Add zucchini, summer squash, eggplant, oregano, salt and pepper and stir to combine. Reduce heat to low, cover and cook, stirring once, until the vegetables are tender-crisp, 3 to 5 minutes.
    • Stir in beans, tomatoes and vinegar; increase heat to medium and cook, stirring, until heated through, about 2 minutes. Remove from the heat and stir in Parmesan.

    I love the bite that the red-wine vinegar gives to this dish.  The vegetables are all taste amazing, and you cannot stop shoveling this in your mouth.  The vibrancy is amazing with all the red, yellow, green and purple that you get from the produce.  You leave the table feeling not weighed down by a heavy meal.  I upped the vinegar in the dish just because I love vinegar, but you could easily reduce it or just use olive oil if you don't like red wine vinegar.

    Pretty Produce

    Finished Product


    Mini-meatloaves

    When I was a little kid, I used to have this poster with Bert and Ernie on it.  I think it just had random facts about them, but one of their favorite foods was meatloaf.  I used to ask my mom all the time to make 'Nernie's' food, which was meatloaf.
    To this day I still love meatloaf.  But, not many other people in my family do.  One day I was watching 24 hour Restaurant Battle on Food Network and one of the teams made cupcake meatloaves.  I had never even thought of doing that, so here is my adapted version.

     Mini-Meatloaves-  adapted from All Recipes.com

    Ingredients

    • 1 egg
    • 3/4 cup milk
    • Italian seasoning
    • 1 cup shredded Cheddar cheese
    • 1/2 cup quick cooking oats
    • 1 teaspoon salt
    • 1 pound ground turkey
    Sauce- not shown in picture from Pioneer Woman's meatloaf
    • 1-1/2 cup Ketchup
    • 1/3 cup Brown Sugar
    • 1 teaspoon Dry Mustard
    • Tabasco To Taste
    Directions-
    1. Preheat oven to 350 degrees F (175 degrees C).
    2. In a large bowl, combine the egg, milk, cheese, oats and salt. Add the ground turkey, mixing well, and scoop into a pre-greased muffin pan.
      • The meatloaves don't rise like other things you bake, so it is okay to fill the muffin cup all the way up.
    3. In a separate small bowl, combine the ketchup, brown sugar and mustard and tobasco. Stir thoroughly and spread over each meatloaf or heat on the stovetop and place on each meatloaf as it is eaten.  
    4. Bake, uncovered, at 350 degrees F (175 degrees C) for 45 minutes.
    These make for the perfect portions.  They are satisfying, you don't leave the table wanting to have all of them.  Even though I used ground turkey instead of ground beef the meatloaves were still moist and didn't dry out.  The sauce was a perfect compliment to the meatloaf, a match kind of like Bert and Ernie. :)
    • One thing I have been thinking about doing is putting a piece of turkey bacon in the muffin pan before putting the meat in.  That way it would be even more like the Pioneer Woman's bacon wrapped meatloaf.


    Corn and Black Bean Pizza

    When my husband is out of the house on a work trip or mountain biking with his friends, I tend to plan dinners just for me.  Living in Wyoming has made him think that meat must be on every prepared entree or it is just a side, so when he's gone I like to indulge in meatless entrees.

    I found this amazing Corn and Black Bean Pizza recipe on EatingWell.com.  I decided it looked super simple so I immediately put the ingredients on my shopping list. 

    Corn and Black Bean Pizza-adapted from EatingWell.com
    Ingredients
    • 1 can rotel with chiles
    • 1 cup canned black beans, rinsed
    • 1 cup fresh corn kernels, (about 2 ears)
    • 1 pound prepared whole-wheat pizza dough
    • 1/3 cup barbeque sauce
    • 1 cup shredded mozzarella, preferably smoked mozzarella
    Directions

    • Preheat oven to 400 degrees.
    • Combine tomato, beans and corn in a medium bowl. Sprinkle cornmeal onto a large baking sheet. Stretch the dough into shape of pizza pan.
    • Place crust in oven and bake for approximately 5 minutes.
    • Take crust out of the oven. Spread barbecue sauce on it and quickly sprinkle with the tomato mixture and cheese. Place back into oven and cook until cheese is thoroughly melted (about 10 minutes).
    Fresh from the oven

    This pizza was irresistible.  The barbeque sauce was a perfect tangy complement to all of the toppings.  The Rotel tomatoes gave it a little bit of a kick with the chiles that was balanced by the cheese.  The only thing I would recommend is make sure your crust thickness is consistent.  I had problems with some parts having too much dough and not enough toppings.

    It heated up great for lunch the next day, and is totally in my mind to make when J goes out of town again.


    Friday, August 12, 2011

    Grilled Veggie Sandwich

    I absolutely love sandwiches, there are so many combinations and they are fantastic either hot or cold.  I was excited about this recipe that I got from elliemonster2012 from The Nest for the Summer Vegetable Swap.  The only thing that I did differently from the original recipe was marinate the mushroom caps in red wine vinegar and sprinkle rosemary on all of the vegetables before we grilled them.   We also didn't grill the bread, which the elliemonster2012 suggested.

    This sandwich was amazing.  The red wine gave the mushrooms that little bit of extra flavor.  Even through the mayonnaise you could taste the vegetables and the freshness.  It was very filling and light.   Jacob grumbled over the fact that it was meatless, but he did say it was good.


    Grilled Veggie Sandwich- adapted from elliemonster2012 (allrecipes.com)

    Ingredients

    • 1/4 cup mayonnaise
    • 3 cloves garlic, minced
    • 1 tablespoon lemon juice
    • 1/8 cup olive oil
    • 1 cup sliced red bell peppers
    • 1 small zucchini, sliced
    • 2 portobello caps
    • 1/4 cup red wine vinegar
    • 1 red onion, sliced
    • 1 small yellow squash, sliced
    • 1 ciabatta loaf
    • Rosemary sprigs
    • 1/2 cup crumbled feta cheese

    Directions

    1. Marinate the portobello caps in the red wine vinegar for about 25 minutes.
    2. In a bowl, mix the mayonnaise, minced garlic, and lemon juice. Set aside in the refrigerator.
    3. Preheat the grill for high heat.
    4. Brush vegetables with olive oil on each side. Brush grate with oil. Place bell peppers and zucchini closest to the middle of the grill, and set onion and squash pieces around them. Cook for about 3 minutes, turn, and cook for another 3 minutes. The peppers may take a bit longer. Remove from grill, and set aside.
    5. Spread some of the mayonnaise mixture on the cut sides of the bread, and sprinkle each one with feta cheese.